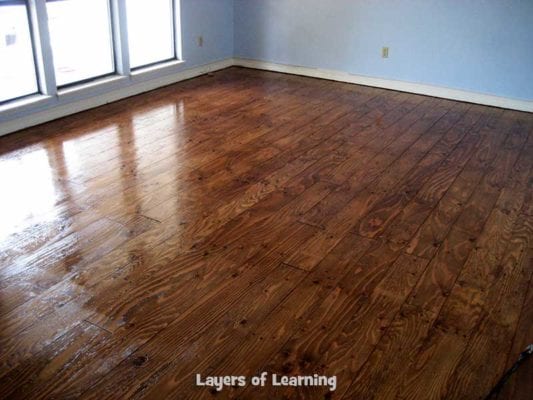
Plywood sounds so . . . cheap. But look how our plywood floors turned out!

I’m loving it.
The reason we chose to go with plywood floors instead of pre-engineered floors are:
- Cost. This method was MUCH less expensive and we have a whole house to re-do.
- We like a more rustic country kind of feel, wide planks, real wood with real grain, not a picture of wood . . . we wanted the real thing, baby.
- It may take us awhile to install all our floors. Like I said, we’re re-doing the whole house, one room at a time. So we could have bought all of the floors for the whole house, except where to store all of that? And spacing out the purchasing is easier on our wallet, but there is never any guarantee that the product we bought six months ago or a year ago will be there today to finish the project. I have no desire to spend all the money and time on new floors so they can almost match. Since we’re staining and finishing these ourselves we can be sure of a perfect match.
- If part of the floor gets ruined in the future we can rip up just those boards and replace them with an exact match (see #3).
So here’s how we did it
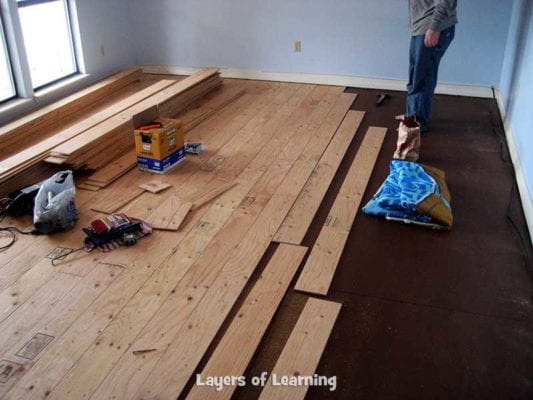
- Measure your room and buy enough plywood to cover the floor. There are different grades of plywood. “A” grade is the nicest, it comes with one very clean and sanded side. This is not what we went with because, as the guy at Lowe’s said, we can sand it ourselves and save big $$$. A sheet of “A” grade plywood costs about $28 in our market, but a sheet of “C” grade plywood is only about $14.
- Cut the plywood into long strips. We wanted pretty wide boards so we went with 6″ strips. We have a table saw that we used for this job. If you don’t have one, borrow one or buy one. The 6″ width did mean we had some waste as the last row of the wood is less than 6″, but we used this extra on the edge by the wall where we needed some narrower pieces. After the plywood is cut, stack it in the room where you’ll be laying it for a couple of days.

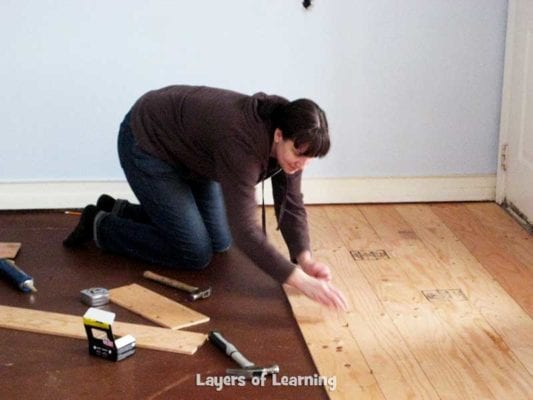
- Spread “liquid nails”, a construction adhesive, on the back of each board. Then nail the boards down. We put two nails in each end and three more pairs of nails up the length of the board. In between boards you need a little space and it’s nice if it’s uniform so don’t just eyeball it. We used pennies for spacers. It took two days to lay the boards for our 20×13′ room.
- Once all the boards were laid and nailed we set the nails in so they would be below the surface of the wood. Then we sanded the whole floor with a belt sander, sanding in the direction of the grain. I’m still sore from that particular step. It’s spankin’ hard work.
- Then we cleaned up and vacuumed the saw dust up. Once the floor was clean I spent two hours sliding around on my backside on the floor and staining it. We went with a medium brown “Early American” from Minwax. I just used a rag, dipped in the stain, and wiped it on the floor. Gloves and ventilation are a must.
- The next day I started spreading the finish coats. We decided to use Varathane Polyurethane floor finish. It’s water based, high traffic, no odor (really, no odor) and drys in just two hours. The directions say to put on at least four coats. We did six coats . . . boys, you know. After the final coat you wait three days before you go move the furniture in and start using the room normally so that the finish coat can cure. This type of floor would look awesome painted as well.

The Cost Breakdown
Our living room is 20’x13′ which equals 260 square feet.
We spent $13.97 each on 9 sheets of 11/32″ “CD” grade plywood = $125.73
The Varathane polyurethane floor finish was $49.98 per gallon and we used 2 gallons to do six coats = $99.96 (If you did only four coats you could get away with just one gallon)
Minwax stain was $20 for a gallon
We also bought an applicator pad for the polyurethane for $10 (you need the applicator, which you attach to any broom handle)
Then the nails were about $20 for 1 1/2″ finishing nails.
The liquid nails were $53.28 for a contractor pack of 24. We used about half of them, but since we plan to do more floor we just bought the big pack.
Total cost for the living room was $328.97 which works out to $1.27 a square foot for real wood floors. Not bad.
More From Layers of Learning
Layers of Learning is a homeschooling site. Here are some things you can do with your kids.

Free Samples
Try family-style homeschooling now with free samples of four Layers of Learning units when you subscribe. You'll get to try family-style history, geography, science, and arts with your children.
You can unsubscribe any time.

They look fantastic!!!
They look awesome!, & so much cheaper. I noticed the stain “early American”, the same color I have on my kitchen cabinets!
Better yet…I had Home Depot cut the plywood boards for me. (No extra cost, cleaner cut)
I used a belt sander and sanded each board BEFORE they were installed. We also stained and ‘white washed’ each board, then installed them. (These went on the wall instead of the floor, but its all the same.) We used an air powered brad nail gun. (Saved a lot of time [counter sunk] and no hammer marks.)
did they give you a hard time about cutting the boards tho?
How did you apply the wood over concrete?
Our subfloor is particle board. We have a pillar foundation on our house. Some people have said they would put down a barrier on the concrete, use the glue as in the post above, and then use concrete nails to keep the boards in place as the glue dries.
Our home improvement stores will NOT cut the boards for you. ? They have a limit of 2 cuts on anything.. per customer, per visit.
I keep reading to have your home improvement stores cut your project. Not ours.
No way this holds up, you will regret glueing them down when you have to rip it back up. There’s a reason we make floors from hardwood!!!
Been holding up for years and years. We still love our floors.
Just curious, did you used an underlayment – as with laminate-floating flooring? If you had to pull anything up, this would make it MUCH easier! I’m researching for rental redo’s because I’ve spent sooo much $ on flooring every few years. Luckily, rustic flooring is very fashionable these days 🙂 Looks good, great job – and really good instructions!
No, no underlayment. That would prevent the glue from holding the boards to the sub floor.
Omg omg!!! You guys are the best! Thank you for sharing such awesome details. I’m seriously asking for Lowe’s gift cards so I can start doing our whole house as well!!!! Y’all rock
All the work was worth it. They look amazing! Good luck with the rest of the house.
All I can say is, WOW. I want these floors!
These look great! Wondering if you could skip the sanding since you are doing so many coats of poly… wouldn’t those make it smooth on their own?
No, you really can’t skip sanding unless you buy A grade plywood, which is so expensive you might as well buy pre-finished hardwood floors. C or D grade plywood, which is what we used, is quite rough.
Hello I was wanting to know if you painted your subfloor before putting the planks down..? Thanks
Yes, we did. We used a dark brown floor paint. The subfloor shows through the gaps between the boards. It should be painted to match whatever finish you plan to put on your planks.
The sanding helps with making the paint stain more uniform and not blotchy. ?
What was your subfloor? Sheets of plywood? What all is underneath?
They look GREAT!
Underneath we have particle board sheets.
Do you think this would work on top of concrete subfloors?
Yes, but first I would seal the concrete with a moisture blocking paint. Then you would have to buy special nails for concrete applications.
Unless the concrete floor had insulation put down before the concrete was poured, it has the potential to sweat – even if it is sealed. The temperature and humidity difference from one side to the other of an uninsulated slab cannot be avoided when the space above the slab is a finished, conditioned living space. That will not be good for the wood.
Yes, be careful with concrete. Apparently we didn’t have insulation put down under our concrete and then we put down a subfloor with carpet on top. Not quite the same thing as a wood floor, but the end result might be similar. We have had a moisture nightmare with musty floors and no one we have come across can offer any suggestions on how to fix it. We even resealed our concrete.
I have worked in hardwood flooring and at one time even owned a store. Where I to do that on a concrete floor, number one and never skip, sand all the loose paint off that floor. Then seal the concrete, if you don’t, moisture will twist and warp that floor for sure. I would recommend Bosticks Vaporlok glue. It seals as well. Since there is no tongue and groove, you will have to get a hammer drill and drill two holes per end, two more in the middle, with anchor type bolts. And even then, this might warp and move on you. For concrete, this will be labor intensive. I recommend a regular tongue and groove plank type floor.
If you have a router table, you could create your own tongue and grooves in the plywood.
I love this! It looks really great. A couple of quick questions: 1) why the space between boards (I like the idea of using pennies)? Wouldn’t the subfloor show in the space? Also, does a lot of dirt and dust collect there? 2) how did you stagger your boards and still use all the same length wood? I like the way it doesn’t look too uniform, but since I’m a newby, I was just wondering how you did it. Thanks!!
Wood expands and contracts with seasonal changes in temperature and moisture so you need at least a little space, but the penny width is actually more than you strictly need. Yes, your sub-floor will show through in some of the gaps (the gaps are not totally uniform and some end up being larger than others, it’s the nature of the beast). Our floor was already painted a dark brown becasue we lived with sub floors for several months while deciding on our course of action floor-wise. I do recommend painting your sub-floor a dark color or if you plan on painting your wood floors, paint your sub-floor the same color as you intend. Otherwise you’ll be down on your hands and knees with a little paintbrush filling in spots.
Some dust and dirt does collect in the cracks and every few weeks we just run a vacuum over the floor. The boards start out all the same length, but when you get to the other end of the room on your first row, you’ll find you have to trim. The trimmed piece becomes your next first piece. That’s how we did ours, so it ended up pretty random looking. I like that personally.
I’ve a question …………. but, isn’t plywood made with layers of ‘ply’ staggered, glued and compressed in opposite directions?? If so, how could it expand and/or contract? Wouldn’t the east-west plys not allow the north-south plys to move? Just wondering.
You are correct plywood should not expand and contract, that is one benefit of using it. At least in woodworking projects like cabinet making you never have to worry about movement. I love the floors though. I would love to hear +Nash A. what he/she thinks about it.
I know this is now years later…did your boards shrink
Nope! We still love our floors and they stayed very nice over all these years. We’ve gone on to do more of the same flooring in other parts of our home and have loved it.
As time goes on how do you maintain these floors? Do you mop as usual or do you wax? I love them!
On a daily basis we just sweep or vacuum. When I need to do more of a cleaning, once every few weeks (footprints and other minor dirt doesn’t show at all) I clean with a damp rag on hands and knees. You could also use a lightly damp mop, not dripping wet, or a Swiffer style spray mop. I never use any chemicals or soap, though if you needed to, like someone threw up all over, you could. The thing is to make sure it doesn’t get soaking wet, like any wood, or remain wet because the wood will absorb the moisture and your floor will be warped. I have never waxed, when you use polyurethane you don’t need to. Honestly, these along with my dark colored tile in my kitchen, are the lowest maintenance floors I have ever had.
Actually what you are really cleaning is the top coat of poly…not the wood itself 😉 However one wouldn’t want to get the wood (plywood or hardwood) overly wet anyway. I used to have all oak hardwood floors in our former home. I would use a Swiffer dry, or vacuum if something really bad got tracked in, then use a very damp microfiber mop.
LOVE LOVE LOVE your floors! I really want to do this in our current house. SO tired of the light carpeting with 3 dogs…..
Why not just leave your expansion gap at the edges? They do it when installers install real hardwood floors. And plywood is suppose to be more stable then ordinary wood.
Honestly, I think it would be fine to leave no gap. Except there will be a bit of a gap anyway. It’s not tongue in groove, you know? But also the plywood cuts, the planks are not as perfectly straight as a factory produced floor. Often we had to wrangle the boards into place and hold them tightly while we nailed them down. So you could snug them up against each other as closely as possible and be fine. You will have gaps here and there anyway though, it would not be a smooth tightly planked floor in any case.
Is there any reason you could’t do a skim coat to get rid of those small cracks. Especially if you leave an expansion gap along the edges. I like this, but I cant get past the gap. Such gaps have caused me problems in the past.
LOVE THESE FLOORS. How resilliant are they? Do they scratch easily or dent? Thanks for showing off your hard work.
They aren’t as durable as a hardwood. They dent and scratch more easily. We put furniture protectors under the legs of our furniture, including our dining chairs which get daily use by boys and we don’t have any scratches around the table. Doing floors this way is a more rustic look though so the few dents and scratches we do have don’t bother me. After nearly a year, I’m still very happy with the way the floors look and feel.
I love how your floors turned out! I’m just wondering, after the few years have passed, how they are holding up and if you’d do anything different. you can send me an email directly if you want (to patriciatruel@gmail . com)
We really still like the floors. In fact we replaced the carpet in two of our bedrooms with these floors a month ago. They do get dinged up a bit because they are soft wood, but not badly. I like a rustic country feel so it works for me. The only thing we did differently with the floors this time was to not leave spaces between the planks when they were laid. We just snugged them as close together as possible.
Did that work better not leaving a space then? Also when you used the poly over the top do you feel like it made them too shiny? I really want that rustic barn wood floor look so I’m worried the poly will make it too shiny looking? Any thoughts?
Yes, leaving no spaces worked great. I’m really happy with it.
You can buy Varathane in different degrees of “shininess”. There is a flat or matte version as well as satin and gloss, etc, just like in paint.
So since they don’t have tongue and groove lock like factory made flooring. With the plywood being straight edged. It still works just as good? Just wondering about sliding or worping ,shifting …….. and this is what we are working towards on our living rm . 14X17 room. Because it’s going to be too much work to sand our old wood floors . Nothing in this house is straight Or level LoL
No, the wood planks are solid once they are down. The glue combined with the nails holds the planks very firmly. We’ve had our floors in our house for more than three years now and have had no problems at all.
Looks awesome! Great alternative to expensive hardwood floors, and of course…carpet! Just the idea I was looking for. Thanks for posting!
What a great job you did !
The floor is georgeous. I really, really want to put this in my bath and my laundry. Bad idea due to moisture ? Thanks for your advice !
Well, if you have kids that use the bathroom I wouldn’t recommend it. Laundry is probably okay if you have a top loading machine. Front loaders tend to leak much more.
Oh I was hoping this for my laundry room because it’s right off the kitchen, which is where I am wanting the plywood floor. How about the liner recommend for the factory made wood floors? Wonder if that would work? But my laundry room is cement floor. In delimna for sure. After seeing yours I would like to do my kitchen.
When u nailed the wood down what did you use to put in the nail holes?
A hammer. Old school, but effective.
Wood filler/putty
The floors look great. A couple of questions
1. How does the grain look? Plywood typically has a distinctive plywood grain. Is it obvious that the floor is plywood
2. I have a small dog. Once and a while he doesn’t make it outside! We usually can get it cleaned up pretty fast. What are your thoughts?
3. I was wondering if something like a spar varnish would give a better seal. What do you think.
4. As far as the craks go, I’ve seen that some people fill the cracks. I think there is a floor wood filler for this purpose would you recommend this?
Thank a lot and great job!
First of all, I’m not an expert, just a DYIer, so whatever I say, I may be wrong.
I don’t think the grain looks like plywood. People think we’ve laid down planks of wood when they see it. Plywood is after all just wood, usually pine. So it looks like pine and it’s soft, not hard like oak. But because it’s plywood and not just a plank of pine it’s tough and durable. Still you’ll probably end up with a few dents and scratches. Personally I think that adds to and is part of the charm of having a wood floor.
If messes are cleaned up quickly they won’t damage the floor. It’s moisture soaking into the wood and warping it that’s a problem, just like any wood floor. Plywood isn’t any more susceptible to damage than other sorts of wood.
I have no idea whether spar varnish would be a better seal. The product we choose was made specifically for floors so that’s what we used.
As for filling in the cracks I think that’s a purely ascetic choice. Dirt that falls in is easily vacuumed out. I wanted a rustic look and cracks between the planks does the job. If you want something more finished you should probably fill in the cracks. Sounds like a lot of work though.
Good luck. I hope that helped.
Hi! Looks amazing.
I have one question, do you have any close up photos of your nails, or are they pretty blended in? Just curious how it looks around that area. I also have read about people using screws (counter sinking and filling), why did you choose nails?
I love the way this looks! Did you have any trouble “joining” the rooms together? I am worried that I will do one room, and then go to do the next and I will have to trim all my boards because the walls weren’t exactly straight, or something along those lines.
We used “Liquid Nails” which is really what is holding the floor together. The real nails are in large part just for the look and to set the floor in place while the glue dries. I think screws are unnecessary and way too much work.
Here is a close-up of what the nails look like in our finished floor. They are countersunk so all you see are a couple of tiny holes. They are unnoticeable until you look closely.

No we didn’t have any trouble joining our living room with the hall and then the dining room. When we finished the living room, we just kept going right into the hall, trimming along the walls as needed. It went together really smoothly and unless your walls are incredibly messed up and not-square the trim along the edges covers up any gaps that might occur.
Here is a picture showing the floor where the living room meets the hallway. The board in the center required some trimming around the ends where the walls are. After that we based everything off that board, so there are narrower boards on each side in our hall, not just on one side as in the living room.

Just curious, A grade has both side sanded well. But now you are using it only one face visible. So can we use A/BB or A/CC for flooring?
You can use whatever you want. But when you start using A grade the cost shoots up, double at least.
This is a great idea! Way cheaper then most flooring choices. I’m seriously considering this for my bedroom remodel I will be starting soon, I had in mind a black and white color scheme for the room, so I was wondering if it would work to paint the plywood in place of stain? This really looks great! So glad I found it.
Yes, paint would look awesome!
Looks fantastic!!! Just wondering what made you go with 11/32″? Would the floor be less likely to warp if it was thicker like 3/4″? Also you mentioned that you had a tile floor. How was it transitioning to the tile floor?
The thinner wood is quite a bit cheaper. It didn’t warp at all and we’ve had the floors down for more than a year. The liquid nails really very firmly keeps the floor in place. I felt like the thinner plywood was very substantial. It’s as thick as engineered wood floors and every bit as durable.
As for the transition between the wood and tile, along the edge of the tile, we cut a little bevel so it slopes down to the level of the wood, it’s only about 1/8″ below the level of the tile. It’s very smooth, looks good and no one has ever stubbed their toe or tripped.
What kind of plywood did you use? A softwood or hardwood? Most plywood sold at lowes or Home Depot would be pine. I just worry about the durability with a softwood.
It’s pine, a softwood. It does get dinged up fairly easy. If you’re going for rustic, like we are, that’s fine. If you want something very sleek and refined this is not a good option.
Hi! I love your floors 🙂 I wanted to ask you if you could provide more details on how to counter sink the nails? I know with srews its as simple as screwing them in further, but I have no clue how to do the same with nails. Thanks!
You pound them normally with a hammer, or if you are blessed, a nail gun. Then you use a little pointy tool, called a nail set, made just for the job, place it on the head of your nail and hammer on the back side of your tool to put the nail in a bit deeper. You just want to tap it in or give it one hit, you don’t want to accidentally push your nail clear through the board. Ask at your hardware store for a nail set to counter sink nails, they’ll know what you’re talking about.
Any opinion on staining the planks prior to laying them down? Thought it could be easier to stain them while sitting/standing at the table in my garage instead of sitting on my butt trying to do it…
You could do that. You would still need to sand them before staining them. You may also need to do a final touch up coat once it’s laid.
Love it! My wife and I are considering this. Right now, our kitchen/dining room are like square vinyl tile. I’m assuming we could just pull those up and go straight into the subfloor?
Yes, ours is laid directly on the subfloor.
There was no underlayment? Was your subfloor concrete?
No, no underlayment. The sub-floors are particle board, which we painted with a floor paint before we laid down the boards.
I love your gloor
Thats exactly what i am wanting. But right now all i have is a subfloor. I am trying to learn the step by step instructions on this. I have hear many people pus a felt down on subfloor for moisture than the wood floor
Is this what you did? Or what did you do for yours?
Thsnk you for your help..
No, we put the wood directly on the subfloor. Our foundation is pier and we live in a fairly dry climate, so moisture isn’t an issue for us. You have to determine what is appropriate for your circumstances.
What a great idea! We just moved to a house with a partially finished walk out basement, however the main unfinished part is the floors are still concrete. We just put a giant area rug in the family room but I really hate carpet. One of the great things of this house is it has original hardwood still on the main floor in the hallway and bedrooms and tile in the kitchen and bathrooms. The only carpet in the whole house is the front room. We may just have to try doing something like this in the downstairs.
I was just wondering what the name of the shade of minwax stain you used? We are doing our floors this way this weekend and I love the colour of your! Thanks!
It’s “Early American” from Minwax.
Thanks!
The exspansion and contraction of plywood is so slight that when used for roofing it only requires a spacing of 1/8″ between sheets. The moisture and tempature fluctuations are far greater on the roof than inside. I would think you could do the same as for manufactured flooring and only leave gaps at the walls. Wood exspands fairly equally in in all directions. So it will expand more in length than width, providing the length is larger than the width. Therefor eliminating the gaps and keep it looking cleaner. Most table saws rip fences are less than 2′ long, by adding a longer board to the rip fence will help making straighter cuts. Also by putting a slight bevel to the top edge of each board if you have small gaps you will hardly notice the while standing, now if after a few beers you are crawling on the floor they would be more noticeable. I make most of my own furniture, cabinets and do construction, so i have had a few years doing this type of stuff. Your floors do look great, nice job.
What type of saw blade was used…….fine tooth, medium,
carbide?
To cut the 6″ wide lengths we used a medium carbide tip blade on a table saw. To trim the lengths down to size so they would fit in the room, we used a compound miter saw also with a medium carbide tipped blade.
Quick question! My husband and I are planning on doing this to our floors and we wetr talking to a friend about it and he said we would need to put padding down or the floors will eventually start squeaking really bad and the nails will start coming out. Have either or those things happened with your floors? And you have had them down for a while right?
Our floors have been down for about two years now and no squeaking or nails pulling loose. I think that might happen except that when you lay the boards you put down construction adhesive and it is the glue that really holds your wood in place. It’s very solid.
Nice Job!
I installed solid hardwood floors for three years as a profession and although I think a solid hardwood floor would last longer, can be sanded and is more durable, I think you have done an excellent job!
If I were to do this (and I’m actually considering it for my walk-in closet floor and my mud-room entry area) I would leave the gaps (min. 1/2″ each wall) around the perimeter instead of leaving gaps between each board.
If you have a planer or a router table you can make the widths more uniform and (as previously noted) slightly bevel (undercut) each piece to obtain a tight, uniform fit.
If you have a wood subfloor, just topnail in uniform rows.
A nail gun (perhaps rented) would make this a breeze.
I don’t think I would use liquid nails although you have clearly shown that it will work. I’d lay 30# felt roofing paper under to act as an underlayment for moisture resistance and allow for some movement.
Since you won’t be able to re-sand, just be sure to rent a buffer with pad and 120 grit sanding mesh before your current finish wears through. By doing this you can then lay another coat or two of finish that should last another 5-7 years.
All in all, an excellent idea, I like it!
Thanks for sharing your idea and techniques!
I’m all for finding ways to save $ while still creating a beautiful floor … you’ve shown us how … thanks.
It’s nice to get some expert advice. Thanks, Dave!
Dave B.
I have concrete slab under my carpet. I wanted to replace carpet with this idea. What is your professional option as what to put down before plywood? Thanks again.
Dave,
Any recommendations for laying this over pre-existing tile? if something like felt roofing paper was rolled out, could we float the plywood? Or maybe liquid nail to the tile? could we use concrete nails on tile?
Hi Jess,
Just reading the comments and saw yours unanswered. With this type of flooring, you won’t be able to float it over tile unfortunately. The floor needs to be level (tiles usually aren’t) and you won’t be able to nail through them either as they will break. Better to remove them first, level the floor and then install.
Nicely done Karen and Michelle! A good cheap option for sure.
Oh, I meant to say that your floors look wonderful!
If others do decide to fill gaps, holes … I use a water based filler called “dura seal Trowelable Wood Filler” and I believe it’s around $28 gal. Not too bad to trowel on using a 10″ steel flat trowel, look on YouTube to see demo of filling a wood floor for an example of how to do it.
Best oil based polyurethane around (I think all old timer floor sanders would agree) is Fabulon, I prefer Satin finish, It’s slightly more expensive than Varathane but is the best you can get in terms of durability/ toughness.
Thanks,
Dave B
Layers of Learning… These floors look great! My next adventure is to convince the husband that it’s doable… he’s a skeptic about everything that is out of the norm, especially if it is DIY. 😉
My question is for Dave B: You suggested oil base polyurethane (which I would use too because of how durable and smooth the finish ends up being), which kind would you suggest that wouldn’t yellow over time?
Hello Susan,
I believe any oil based polyurethane will appear somewhat amber initially as well as over time but I don’t see this as a down side at all. In fact, I think it’s a more natural look than something perfectly clear or foggy whitish haze, such as a Swedish finish or some of the water based finishes. The way I see it is that the oil base works well to bring out the natural beauty of wood as well as provide a very resilient and durable surface.
As far as brands go, all polyurethane finishes are not equal. I prefer satin, Fabulon Heavy Duty Wood Floor Finish. It’s slightly more expensive but extremely durable and has an exceptionally high polyurethane resin content.
DuraSeal is pretty good but not as good and I’d steer way clear of Minwax brand. Some states have restrictions on VOCs (volitile organic compounds) so if you live in Calf. for example, you may not be able to get some of these shipped to you.
The only downside I can see in using an oil based, heavy duty Poly is that you do need to give them time to dry between coats. I would go with 3-4 coats and sand very lightly (120-150 grit mesh screen), vacuum and tack between each coat.
Just to be clear, I have no problem with Minwax stains, just would not recommend their polyurethane(s). If you do stain, it’s best to use an oil based stain if using an oil based polyurethane.
The following website has lots of good info. that you may find helpful.
http://www.woodfloordoctor.com/_ask_the_expert/comp/fabulon_and_water_based_wood_floor_finishes.shtml
Thank you for all the process and product insight Dave! I only use Minwax on my furniture and usually only water based poly, which I have a hate/love for…. quick drying, but can totally pull the finish if it dries too quickly.
Dave, what finish would you recommend for a painted floor? I will be using a water baseporch paint and doing a white-wash finish.
love it soooo much!–one question tho–what if you have to pull it up? Can you?
Thanks!!!!
Well, we haven’t pulled any of ours up, but if we did need to we could pull out individual boards or the whole thing with a crow bar without too much trouble.
I just wanted to say that this is a wonderful step-by-step and you’ve made me want to do this to my carpeted rooms. Thank you very much for taking the time to show us how you did it!
Ok, I went through 40 sheets at Lowes. Found two that were usable. Did you sort, or just tossed the bad strips after cutting?
We sorted somewhat. But if the sheet had one good side, which is usual, we used it. Some of the boards we used weren’t perfect. We sanded down rough spots.
Went to a different Lowe’s, sorted out the warped ones. Starting with my daughter’s room. The plan is doing this in two bedrooms and the hallway. Now on the 4th coat of poly, and the floor looks great!
Thanks for the easy instructions!
My partner and I stumbled over here by a different web address and thought I should check things out.
I like what I see so i am just following you.
Look forward to exploring your web page yet again.
ok, my husband and I really want to do this, but our subfloor is concrete… does that put us out of luck??
Not necessarily. Some concrete floors “sweat” a lot. If you have lots of moisture you might have a problem. Before you lay the floor you should paint with a moisture block. The other thing you have to do is get nails that are especially for concrete.
Hi! Just wondering if you could post more pics of your floor now and what it looks like with furniture on it? You did a great job and this blog is so helpful!! Thanks for taking the time!
Great piece, with some good treatment this floor looks amazing
My husband and I are buying a home and re-doing the main floor flooring. I wanted hard wood flooring and found out quickly that its too expensive. Looking on pintrest and coming across your blog gave me new hope that it can be done!!!! My question for you is…..My husband wants to lay something down on the subfloor because he thinks if we did this floor and wanted to tear it up it would take the subfloor with it or be too difficult. I see what he is saying but wondering what you would suggest to use for a barrier? Did you have any problems with doors ways? The house now has horrible thin laminate flooring and I feel once I rip this up and lay down 3/4in plywood the doors wouldn’t open or I wouldn’t be able to have rugs. Any suggestions? Thanks and I love the floors!!!
We haven’t actually tried to rip any of our boards up, but I really don’t think it would take the subfloor with it any more than ripping out linoleum or tile takes the subfloor up when you do that. There would be some scrapping off of glue if you ever took up boards, but the subfloor should stay in tact. The problem with using a barrier is that the floor is floating, not really attached to the subfloor at all, you would be using big nails to really attach the plywood planks and not the glue at all. I suppose you could go that route, skip the glue and just use big nails as your fasteners.
The plywood we used is only 3/8″ thick, not 3/4″. 3/4″ is really thick and expensive so if you want to use 3/4″ you might check the price first. It may not be much cheaper than engineered hardwood. Our flooring now is actually a bit lower than the carpet we had previously and about the same as the laminate flooring we used to have in some of the rooms. We do not have problems with doors.
Wanted to update you. 3 bedrooms and hallways are done. It looks great!
Folks, it’s not hard to do. Just take time. I went to lowes and bought the cheapest compressor and finish nailer. Cheaper that way than renting. I put the floor down over the laminate flooring. No glue, just popped nails every 18 inches. I had to trim the bottom of one door. Chances are you will have to trim. It’s not noticeable when you put the baseboards back on.
Also it was a great chance to work with my 13 year old son.
It is still engineered wood. plywood is engineered. I’m doing this with grade A plywood though. Not much more expensive here. Did you start from the center and work out?
No, we started along one wall of the room and worked across to the other side.
This is an incredible thought! Way less expensive then most deck decisions. I’m genuinely considering this for my room redesign I will be beginning soon, I had as a top priority a high contrast shade plan for the room, so I was thinking about whether it would work to paint the plywood set up of stain? This truly looks incredible! So happy I discovered it.
Love this floor! I’ve just started working with wood, but having a blast! We resently bought an older home 1927. I know there is an original hardwood floor already down. On top someone has put subflooring, then self adhesive tiles? Really hard to take up as I’ve tried in one corner. Would I be able to just place the wood on top of the current floor without removing old tiles? Then sand, glue and stain as you have done with your beautiful floors! Did I say I love this floor! Thanks for sharing!
I’m not a professional builder or wood worker, just a DIYer so I can’t really give you good advice about whether you can place a new floor on top of the old. But if the base is sound, no rotting, then it should be fine.
Thank you so much for this information. I need to replace a floor and this is what I wanted to do but didn’t know how. This will be perfect. Did you know that Home Depot will do 12 inch cuts on the panel saw. This would save you half the cuts and make it easier to transport. I can’t do this until spring when I can open the windows. Thanks again
I forgot to ask What size nails did you use. ?
We did our whole house with Oak plywood. It has a thin piece of Oak on either side We cut 6″ wide planks also and then lightly sanded with a sanding block. Then stained top and sides with a lambswool pad and wiped excess with a rag. No need to leave a gap as plywood does not contract and expand. We used glue and a nail gun. Can easily lay a whole room in a day with two people and saw nearby. 3 coats of poly. Our cost in Texas for all materials was $1 a square foot. Only drawback is you can never sand and refinish since Oak is thin. When poly starts to wear down, sand and redo poly.
P.S. Your floor is gorgeous!
GORGEOUS!!!! I wonder if you could router the wood instead of cutting it?
You could, but you would have to have thicker plywood, I think. Also the end of your plywood sheet would be very visible.
Sorry couple of questions…What type of subflooring did you use? Did you just lay the subflooring directly on top of the concrete slab? Can I lay the flooring directly to my slab? (Do I have to worry about moisture) we are remodeling a very old home we just ripped up the original carpet from 30+ years ago (yes it was gross!) This is my first time diying and I’m so lost would you have any recommendations on where I should start?
P.s. thank you in advance!
Our subfloor was already down, we didn’t lay it, but it is 3/4″ MDF. Our foundation is a pillar foundation, not slab. Whether moisture is a problem or not depends on the conditions where you live. I’m not sure whether you can lay wood directly on concrete. You should probably ask someone who does flooring for a living.
If you decide you can lay the wood directly on the concrete subfloor you just need to glue it as explained above.
Love, love, love this! It’s beautiful, affordable and totally doable. And all my questions you’ve already answered in response to others (sometimes multiple times). Now I just need to decide whether to start with the upstairs hallway or the kids play room. Thanks for sharing!!
hi I live in Melbourne Australia & I have concert subfloors can I do this floor on concert my hole house has carpet & I want to put wood floors down. Thanks & I love your floors
I honestly don’t know if this floor can be installed on concrete. I think it can as long as your concrete isn’t damp, wicking moisture up. You should check with someone who installs floors for a living. Ask if installing wood over concrete works and if there are any special preparations you should make.
We put a 1/2″ thick birch plywood floor in a basement office over concrete using 20″x20″ squares (found on a clearance rack) with grain rotated perpendicular to each other (like a parquet floor). It is entirely floating…for the good or bad, we’ll see, but so far so good. Method was to first roll out a moisture/sound barrier product on the floor even though we don’t have a moisture problem, laid 3/8″ OSB sheets on top of that (no glue, no tapcons, just side by side) as a subfloor, glued & air nailed plywood squares on top of that. At first it had a bit of pop and crack but after the water based polyurethane was put on, the floor is making no sound and doesn’t seem to be moving anywhere. We did not want to permanently affix anything to concrete so as not to cause a nightmare of removal for the next guy.
Thank you Layers of Learning and Rose for your generous details and pictures. Rose I have your concrete situation, I just wondered how your “floating” floor is holding up. I plan to try your method starting tomorrow. Any other hind sight steps you would change? Thanks Again
Just curious. Do you have a basement? Was there carpet in that room before this? Did you have stairs to do as well? I ask because my husband and I just inherited my parents house and have lots of work to do to it cosmetically. The last it was decorated was in 1994 when my parents bought it. We have four dogs (a Pomchi, a lab and two Pitbulls) and two boys. Carpet just won’t work in our home. Lol. Was this difficult to install? How did you begin with the boards?
Our stairs were wood with carpet laid over the top. We just tore out the carpet and scraped off the glue and stained them. You could do the plywood planks on stairs too though. Good luck with your major re-do.
Amazing!!! Your blog is looking great with the snapshots of the beautiful wood floor. In this post you discussed a procedure how you made it & really fantastic blog and I appreciate your skill. I’d like to say thanks for sharing this and keep up blogging.
The floors look great. Could you run the boards through a thickness planer instead of sanding them? Thanks
If you’re using plywood you wouldn’t want to run it though a planer I would think. The layers of wood are too thin. I’d probably stick with sanding. However, I fully sympathize with your attempt get out of that particular step.
I found this post on Pinterest and fell in love with the idea! I have a question though. I am searching Menards, Home Depot, and Lowes…and I can not figure out what plywood you used! Do you happen to know size and anything else about the plywood? Thank you!!
We used regular old 1/4 inch plywood sheets in CD grade. Every lumber store should carry it.
I done the same thing on the landing of my steps only a few differences i used home made stain cost is 10 bucks for 2 gallons and i cur all my boards with an angle cut on the sides this way when laying the floor they fit together overlaying other but you still get the crack look from sanding the edges the overlay then on the edges is squared this way I use it like a floating floor with the sides holding the center in place its the highest traffic area in the house and it has shown some ware but placement is rock steady cause the board are locked together only used nails on the outer board
Real Wood Floors made from Plywood: Question: what is the reason for spacing the panels?
And how much nail glue do you use on the back side of the boards?
Where do you start in the room to place to boards?
Do we need to add anything to the floor before adding the boards?
The spacing in the panels is for expansion (though other commenters have opined that that is not necessary and I think they are probably right) and for aesthetics.
Just make a zig-zag of glue down the back of each board and lay it down. We didn’t measure an exact amount.
We started along one wall with laying the boards. For us it was an outside wall because we wanted the edge were we trimmed and made cuts to be on the side of the room where the hallway blended with the living room floor.
The floors we laid our boards on were painted particle board sub floor. We painted first so that dark floor would show through the cracks and not light barre wood. Also it protects the sub floor at least a little. But if you are laying on concrete you may need substantial protections against moisture.
First off: Your floor is beautiful! It looks like something that was installed many years ago, and just lovingly kept up.
I see that these were put down almost 3 years ago now. Can you tell me how they’re still holding up? I did read through the comments so I know you’ve said there are a few dings here and there. Besides that, have you needed to do any corrective maintenance? And the biggest question…would you choose the same method of flooring today if you had to do it over?
Thanks so much for this tutorial, and for all of the follow-up answers you have provided.
The floors are holding up very well. And yes, we would do it again. In fact this summer we are planing on doing some of our bedrooms with plywood planks.
So everything up to the clear coating went smoothly. Two questions. First did you buff the floors after each coat of polyurethane and second was both the stain and polyurethane water based? Thanks for the help.
No, we did not buff. Yes, they were water based.
I love these floors and have an entire house to do! So daunting (especially when researching different types of flooring…. $$$$ = Tears)! I know you are probably super busy, but is there any way you could post an update on how the floors are holding up, any issues that you’ve had or things you would change, and maybe pictures of what the floors look like now? I’d love to see them, and I feel it would solidify my choice! Thank you and great site!
Update on the floors May, 14, 2015 –


Yep, they’re holding up well. They look almost like they did when we installed them. There are some dings and scratches, but nothing major. If you don’t mind a bit of rusticness and a lived in feel these are great floors.
Here is a close up. You can see the floor, which is pine, has some dings and scratches. If you mind that, then you should not put in these floors. (This shot is in a very high traffic area where the front door leads through the living room into the rest of the house, so this is the most dinged up part of our floor after three years.
The one thing I would change is that I would not leave spaces between the boards. I would snug them up as tight as possible.
Thnks for the great instructions. We have concrete floors downstairs. Seems doable upstairs.
We also homeschooled our kids (4). All grown and stable kids. God Bless.
You are welcome! Good luck if you try the floors.
They are very beautiful! I’m pretty sure the product is great. I would love to try it on our newly bought house. Will check out more of your posts.
Thank You! Thank you for all your updates. and Thank you for the tutorials and Q&A. I can’t wait to do this! You have been most helpful. Love your floors!
This is amazing!! My husband and I are planning to do this on our main level. I was wondering about the baseboards though. Did you remove them at all to install the plywood? And was there a gap between the the floor and the baseboards after it was finished?
We removed our baseboards. There probably will be a gap if you do not remove and then replace the baseboards. It is unlikely that whatever flooring you had before will be the exact thickness of the new boards you are putting in. It’s also really difficult to get the stain and finish to the edges if you don’t remove the baseboards.
We are planning on doing this in out family room within the next few weeks:) will post pictures!
Awesome Elizabeth! Good luck with it. We LOVE ours.
Love the flooring. Tryin to convince my mother to do with our floors. So many questions!
Do the floors squeak?
Is it cold in winter? Did you do the kitchen too?
No, the floors don’t squeak. Squeaking happens as nails loosen and the boards move up and down, but these floors are glued down. No squeaking. Everything is cold in winter. Everything. Seriously, wood is not as warm as carpet, but warmer than tile or stone. We have area rugs in the living room. I love my floors year round.
We did not do the kitchen in wood. We did tile in there. Like any wood floors these should not be exposed to water much and we have six kids and a dog. It seemed foolish to tempt fate in that way. But if there are no kids . . . maybe.
My question is will using an 18 gauge or 16 gauge nail with a nailer work to hold the boards?
Another option for squeaking floors down the road (years and years most likely) and to help with expansion issues due to seasonal climate changes is to tuck rope in between the planks. I’ve seen this dine in 100 year old house that was refinished. As stated many times, this will most likely not be an issue due to the planks being glued down. I’ve been wanting to do this flooring and can’t wait to have our own home so that I can. 🙂
Your floors are gorgeous! I have been looking for inexpensive flooring for my entryway. Currently I have painted and sealed vinyl over concrete. Do you think I need to pull up the vinyl first or can I lay these down on top? Love, love, love these floors.
You should be able to lay the wood right over the vinyl provided you will still have enough clearance for your doors to close and so on.
Oct 4/15 82
If I were going to do this, I would set the fence on my table saw at 6″ minus the width of the blade then an additional hair width. That way I have no scrap when I have cut across the sheet. I live near Sudbury Ontario and we don’t get that grade of plywood here. Floor looks good. I wouldn’t use a crack as you have done. There will likely be enough gaps without making more. The floor looks good. WEB <
I love this. I have wanted to something like this for a long time. My question is in regards to the finish. Ply never seems to go on smooth. I always end up with a grainy look or bubbles. I have tried rollers, applicators, brushes, and sponges and still I get bubbles. Any thought? I noticed you said you used an applicator, how did you avoid the bubbles?
We didn’t have any problem with bubbles. I think bubbles are usually a problem with the poly, not the stain. So maybe it was the brand we used. Also, never shake the can to mix it, just stir gently. The applicator we used has very short, soft bristles, like a brush.
Have you had an issues with the nails working their way out of the flooring?
Can you elaborate on why you would take out the spacing between boards?
No, the nails do not work their way out. The glue is really the main force holding the planks down, not the nails. This keeps the boards from moving and therefore the nails from working out.
As some commenters have said, plywood doesn’t really expand so it doesn’t need space. In any case the space at the walls, under the floorboards is enough.
Gorgeous floor!! Question: when changing direction of the planks, as going from one room to another, or a hallway, did you simply butt the planks, or is it necessary to add a spacer, as I have seen done when using laminated planked flooring. Wouldn’t it look a whole lot better/cleaner to butt to the boards going the other direction?
I don’t know. When we went from our living room to hall we did not change the direction of the planks, we kept them running the same way.
They look pretty good, but a thoughts here. My opinion will be unpopular, but think it would onky be fair to inform people that there is a much cheaper way to install floors with much less work.
I noticed the sq footage price for your floors cost about $2.08 a sq ft. That is not very cheap, though the quality of plywood is, as it tends to be quite soft and not meant to uphold high foot traffic. It’ll usually get beat up after a few years.
I also noticed there is no moisture barier beneath your floor which could damage and warp the wood if water or moisure pushes through the concrete.
This is a lot of work for a high pricetag. You could instead get the look you want, protection and better more durable quality floors with FAR less work if you install laminate flooring, or even tile. Which costs about .99 to $1.39 for the floors and protective barrier–plus, installation is dar less time consuming. 2 days tops.
It just seems to make more sense buying laminate (which no one can tell the difference between plywood anyway).
We’ve had laminate flooring. We ripped it out after a couple of years because it was warping, moisture had gotten to it and since it is essentially pressed paper, it was destroyed in a few spots, notably where our dishwasher leaked. Laminate can be pretty, but the plywood floor we installed is every bit as pretty. A plywood floor is more work to install than laminate, but it will last much longer too, especially if you buy the cheaper laminates in the price ranges you are talking about.
Yes, plywood is a soft wood and yes, it will get a little beat up over the years. People who want a very polished sleek floor should not install a plywood floor. But if you want or don’t mind a more rustic feel then this floor is great. We have had ours in our house for almost four years now (with six boys) and we love it still. It’s still pretty. It’s still holding up. It’s still easy to clean. In fact just this last year we installed more plywood floors in two of the bedrooms.
In the end it’s probably a personal decision. There’s nothing in it for me if you decide either way.
Layers of Learning, beautiful floors and very informative article. Nice job.
Honeybee, sometimes opinions should just be kept as thoughts in our heads.
If you read the post (completely) you would have read that the actual cost was $1.27 sq/ft. They did not lay this on a concrete slab, they have a pillar foundation, so no need for a vapor barrier and lastly, they wanted a “Rustic Look”!
Thank you soooo much for taking the time to post about your floors and to answer all the questions in the comments. I have read it all and feel much better prepared to put down our plywood floors! (Actually our son is doing the work). We are a homeschooled family with 5 kids (four grown now) and so we really appreciate you taking the time to help others despite your own busy life!
You’re welcome, Kelly!
I love this blog. This blog is what inspired us to do our whole house in plywood. We got out first batch cut into 8″ strips at Home Depot which cost us about 17.50 to have 12 sheets cut. Well worth the $$ for the time it saved us from cutting them. We are doing it just a little different and we stained our boards first before we laid them because we wanted a variation in color. We are using three stain colors that are very close but compliment each other. We are going for the farmhouse look. This will be an ongoing project for us this winter. Thank you so much for sharing. I will keep you posted and send final pictures
That’s awesome! We’d love to see the pics once you’re finished.
Jess, I would love to see photos of this. Do you have any? Would you post the name of your stain colors with it?
Thanks!
I love your floors and I can’t wait to show my husband. We currently have hardwood floors, but they are ugly and in bad shape. It should be okay to put this floor right on top of the old floor, don’t you think? Thanks for the idea!
Love your floors! We just put our plywood down and now looking into staining it! I like the sound of the water based as the quicker drying time seeing as I only have about 2-3 days to be completely finished with it. How many coats of stains did you apply (basically go to the color i desire?) and How long does it take the each coat to dry? How long before I can start applying the polyurthaine?
We just did one coat of stain. Read the directions on the stain you buy to see how long you need to wait before applying sealer.
I have the floors laid but what grit did you use
We used a medium grit. Our goal was to smooth out the roughest bits, not make it perfectly silky.
Thank you for the wonderful tutorial and being so helpful to everyone asking questions! I am a fellow homeschooling mama with eight kids still at home. I plan on doing this in our entire upstairs! I have been researching and scouring deals on plywood. I am so excited about this and seeing your updated pictures is so very encouraging! Thank you again ♡
Hi Amy! As we speak my husband and I are finally installing these floors in our bedroom. It’s years since we did the first floors and we still love them. Good luck with your project!
Thanks for your detailed information about your great-looking floors.
A couple of questions: Have you noticed problems with heavy furniture (for example, a piano or a very heavy antique cabinet) placed on the soft floor over time?
Also, if selling a home in the future, and I understand that this is just a guess, but do you think a plywood floor would be a negative selling point?
Yes, heavy furniture can leave marks. We put floor protectors under the legs.
I can’t imagine that wood floors would be a negative. You don’t have to tell anyone they are made of plywood.
Do you have any problems with splinters from the edges of the plywood from socks snagging them or throw rugs?
No, not at all. We haven’t had any splinters. The wood sands beautifully.
Do you think this flooring would do well in a trailer house?
It seems like that would be fine.
I was thinking the same thing! Thinking about endeavoring a full single wide mobile home renovation in rustic and shabby chic style. Perfect option!
My husband just got done laying down plywood floors in our new home and is starting to stain tomorrow (hopefully) he’s starting to stress over this bc we’ve read so many different instructions and ways to do this..do you mind giving me some more advice on how you did it…how many coats, how long did you wait between each one, did you put it in a bucket and use rags or a mop? Things like that…same with the seal/poly. Stressed and tired 1st time home owners (who may or may not of gotten into a bigger “fixer upper” than they could handle) would really appreciate all the help that can get! Thanks!
There are many ways of applying stain. I’m not sure one is more right than another. Mostly it’s personal preference. The important thing to know is that any way you get the stain onto the wood is fine. Stain is easy. ‘
When I apply stain I wear gloves and use a rag, dip the rag right into the stain container that it came from the store in and wipe it onto the wood. That’s it. For this project I did just one coat of stain. You add more stain if you want the wood darker or more saturated than it got with the first coat.
After I am done with the staining I put the lid back on the stain container and throw away the rag and the gloves and clean up is done.
Love your floors! My husband and I just bought a “fixer upper”, and I thought I wanted laminate throughout, (since REAL hardwood was going to be too expensive). Well, laminate is too expensive as well, especially the one’s I like. We have been researching these floors, and I came across your blog today. Very helpful, thank you! Very beautiful floors! I’m excited to start this, but we’re not at that point just yet. Lots of good information from you, and others, thank you! I can’t wait till we start. He told me he wanted to do 8″ wide planks. Anyone else do them that wide? I was wanting 6″. Just wondering how the 8″ would look. He said “less cutting”, which I totally get since it will be myself and him doing the whole house except for the 2 bathrooms. Thanks again! Love them! Hope ours turn out that well too!
Considering plywood for flooring throughout the house except bathrooms. I’m wondering how well they have held up since youve done it?
It’s been years and they are still in great shape. We haven’t regretted it a bit. They, of course, have the normal wear and tear that you would expect with a family of eight, but no more so really than any floor would have. I would urge you to be careful using wood in any room with lots of water. Even expensive hardwood options get easily ruined in a kitchen or bathroom (our kitchen has tile). Other than that, they are awesome.
Thanks for this tutorial! I put plywood floors in our first floor over Labor Day weekend and I love them!
Wow! I just plowed through this post, and I want to say you have been extremely patient in answering so many questions…..over and over again! The floors look wonderful, and we are about to lay them in our house, pretty much the same way you did it. Thanks again for the tutorial, updates, and pictures. I am excited to get it done and I’ll try to post a pic when we are done. By the way…..did you use plywood? 🙂 J/K…
Hi! A quick question about using pennies as spacers. Did you do this at the end AND the sides of each board? Is the space large enough for anything to fit in (ie:crumbs) or did you feel that it should have been filled with anything?! I may be putting these in my very small kitchen! Amazing job they look awesome.
We put pennies only in the side. However, when we did more of these floors in bedrooms a couple of years later we did not use spacers at all, just snugged them up next to each other as per some suggestions from people who commented on this post.
The cracks when using spacers are large enough for crumbs. It can be vacuumed out, but I like the later floors, without spaces, much better because of the dirt that gets between the cracks. So
I recommend that you not bother with spacers.
Could you post a picture of how they look now, almost 4 years in. We are thinking of doing this in our house. Have you had to revarnish or anything yet
They still look like the last photo update. Some wear and tear, but nothing you wouldn’t expect with a family of 8 on any floors. We’ve been incredibly happy with them. Scroll up a few comments and you’ll see photos years after our install. We’ve since installed more plywood floors.
I agree with Marguerite, same question. I am purchasing a home with old dingy carpet and terrible, hideous tile floors EVERYWHERE!
I love hard wood, but knew that with 4 kids, it would be many, many, MANY moons before traditional hardwoods were in my life.
This post has inspired me!
Hope you try it and love them like we do Althea. Scroll up a few comments and you’ll see a photo update. They still look just like that.
What store did you buy your plywood at?
Some from Home Depot and some from a local lumber store. We shopped around looking for the best prices.
Thank you for sharing
I will give it a try on my house this year.
Floor looks awesome if I could figure out how to post a picture of my floors I would
We’re doing these floors in our house as well! So glad to see how you installed them and how they’re wearing over the years. We’re excited to have a lower cost option to have some nice wood floors in our house!
We are thinking of doing this for our whole first floor, but we live in a place where I’m worried about humidity, have you had any problems with humidity? any buckling or cupping (I think that’s what they call it)?
We haven’t had any trouble with that. We live in North Idaho. We get cool temperatures and some humidity, but not compared with Florida’s or other super-humid places. For us, it hasn’t been a problem at all.
Your floor looks amazing! Did you nail the plywood directly onto the concrete slab?
Hi Erin, Our subfloor is particle floor sheets so we nailed into that. We have a crawl space foundation, not a slab foundation. It is possible to nail directly into concrete if you get special nails for the purpose. The problem with concrete is that it often sweats a lot which would put water continually on your wood floors. So whether you can use wood directly on your concrete depends on the exact conditions where you live and how well you have prepped your concrete. You should probably ask a flooring expert where you live if it would work or not.
Thank you Layers of Learning, I have just finished reading your blog and the complete comment section of this blog. I think you have answered every possible question about how to DIY plywood floors. We have been trying to decide how to redo the floors in our house since we bought it a couple years ago. You have made up my mind. We are currently acid staining the concrete floor in our bedroom. Once finished with this project I am going to start on the plywood floors upstairs. Once again thank you for all the great information. Your floors are beautiful and I can only hope mine will turn out as good as yours have.
Awesome idea for a more rustic feel! I’ll be moving into a new home next week and am already looking forward to doing this. My only question is (I admittedly did not read every comment, so I apologize if you already answered this!), would it be better to nail directly to the sub flooring, or to place an underlayment? I feel as though using an underlayment would make the floor quieter, and possibly warmer in the colder months.
We nailed right into subfloor. Because of the glue, the boards and nails do not loosen and squeak. As for warmth, I don’t know, might be warmer with an extra layer. I haven’t noticed any drafts through the floor in the winter. You might ask a professional. It also depends on your foundation, I expect. We have a crawl space foundation.
I am just drooling over these floors! You really did an incredible job, and you have been so kind to respond to so many questions! I do have a question about the stain color. You said you used Early American (which is my fav)…did you dilute it at all? I ask because in some pics it looks really dark, and in some, much lighter (which I love). Can you even dilute stain? I just want to be sure on the color before making such a big decision!
No, we didn’t dilute it. The pictures were taken in different lighting, which explains most of the differences in color. The pictures that were taken “2 years later” show the stain color faded a bit too.
Also: how did you go around door trim? We will be laying it over the top of vinyl (totally not professional, I know), and the floor boards will be easy enough to pop off, but the thought of needing to do that to door trim is very daunting. Is there any way around that? Is cutting a chunk off the bottom a viable option? Thanks!
In a few places we just took a hand hack saw to the bottom of the door/entry trim, while it was still hanging on the wall.
Can this be done on top of existing hardwood floors without any sort of layer in between?
Hi Kristin. You could, but you would need to make sure your existing wood flooring is structurally sound and flat, with no loose boards etc. Then you could glue and nail them straight on top. If there is a finish on top, I would rough that up with a sander first. But to be honest, unless the floor you have right now is at the end of its life, it might be better to have them sanded and refinished. This is a cool affordable option though if they are damaged beyond repair, or at the end of their life.
What if my subfloor is sheets of plywood? Would you recommend doing something different rather than laying plywood on plywood?
No, you should be able to put plywood on plywood.
Do they scarach easy? I have two dogs in the house and am worried about them scratching them up I don’t mind a few scratches.
My experience is that doing things like dragging heavy furniture across the floors scratches them, but the kids and the dog do not. Scraping wooden chairs in and out around the table left no marks. Still, these floors aren’t for those who want very sleek polished floors. This is for people who like a more rough, country or industrial, kind of floor.
Could u put roofing tar paper on the subfloor then the plywood. That way if you need to change a board it will be easier to remove?
I would love to see a picture of your floors now. Just a real, candid, lived in room! We homeschool too, 5 kiddo’s and are always home so I appreciate a more “rugged” floor- You should see our well worn wooden kitchen table! Thinking of doing this in our home.
Hi Nicole, If you scroll through all the long comments you will come across several photos that were taken years after the floors were put in. Some are close-ups and some show a larger part of the room. If you don’t mind a rustic look them I would totally recommend these floors. I still love them.
I often joke that our kids “antiqued” our dining table for us. Fork marks from banging forks point down, sharpie tracks, scratches everywhere. Good thing I like country style.
I spent 5 days tiling a dining room, I didn’t want to tile. I would have preferred this, much more.
Instead of pennies, a metal ruler would have worked. You do want a very small gap between the boards, for floor movement.
Dinged up? No, authenticated.
Thank you for this post. We too are considering replacing our floors with plywood as we had seen it done in a restaurant we frequented. This restaurant actually painted their floors, and we have not decided which way to go on that note, but definitely feel more inspired now after having read this post. Thank you and your floors look amazing.
Will you send more details about the applicator pad for the polyurethane. When I do a search, lots of things come up.
Pam, the best thing to do is ask the people at the paint store or home improvement store about which applicator pad is best for the polyurethane that you choose.
Ive been wanting to do my whole house like this for a long time. I just haven’t gotten around to doing it yet. It looks like you have something on your subfloor? It looks darker than mine like its wet or glossy. Did you put anything down on it or did you just apply the liquid nails to the flooring boards?
Our subfloor was painted because we lived with just a subfloor for about a year while we were deciding what to do with our floors. You don’t need to pre-paint.
Do you need to put any padding on the floor?
No.
Hi – My husband and I are researching laying plywood plank flooring. There seems to be differing opinions about leaving space between the planks. I have read through your comments and see that you did not leave space with your more recent floors. Could you post a picture of your newer floors without the space between the planks. I realize we would still need to leave space around the edges (as with a floating floor). I would love to see the plywood plank flooring without spacing.
thank you!
Nice !! They look awesome.
Nice!!!awsome blog.
Plywood floors are suitable for any room where you’d otherwise install hardwood, though kitchens and bathrooms are less desirable since frequent water spills are likely.